HoloRepositoryUI 

A web-based application that allows practitioners to browse their patients and manage the generation of 3D models sourced from imaging studies like CT or MRI scans. The client-side application is accompanied by an API server that is responsible for communicating with the other components.
Description
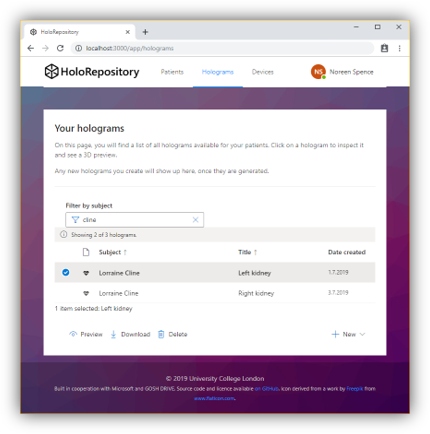
HoloRepositoryUI is intended to be the main interface for practitioners to browse their patients, preview imaging studies such as CT or MRI scans, and trigger the automatic generation of 3D models sourced from the scans in the HoloPipelines.
The UI primarily consists of a web-application running in the practitioner’s browser. It is accompanied by an API server which communicates to the other systems: The hospital’s FHIR server and PACS (respectively the stand-ins we deployed in Azure), the HoloPipelines and the HoloStorage Accessor. The back-end reads and maps data from FHIR.
If imaging studies for a patient exist, a preview of the scans will be shown. The underlying FHIR resource is ImagingStudy, which provides a wrapper around the actual DICOM data on the PACS. In the UI, each of these series provides the feature to start the automatic 3D model generation, and subsequently track its progress. After finishing, the HoloPipelines will automatically make the model available within HoloStorage.
In addition, existing 3D models (in binary glTF2 format) can be directly uploaded to the HoloStorage. To substitute the patient data contained in DICOM files, this workflow allows to add data manually and link the model to a FHIR Patient resource.
Technologies
The client application is written in React 16.8, using TypeScript and built on top of create-react-app.
- Routing: reach-router
- HTTP client: axios
- Form validation: formsy-react
- Linting and formatting: ESLint and Prettier
- Styling: office-ui-fabric-react and ant-design
- Testing: Jest, Enzyme and axios-mock-adapter
The back-end is written in Node / Express 4.16 and TypeScript.
- HTTP client: axios
- FHIR client and R4 type definitions: fhir-kit-client
- Run-time type checkts: io-ts and io-ts-promise
- Linting and formatting: ESLint and Prettier
- Testing: Jest
This app uses TypeScript to provide type safety, static analysis, code completion etc. To facilitate development and enhance confidence in the end-to-end system, both client and server are using the same type definitions.
Architecture
The UI implements a traditional client-server architecture. The server is responsible for interacting with other systems (FHIR server, HoloPipelines, HoloStorage Accessor). It performs data validation and mapping, and sends the required data to the client.
The server’s architecture follows common Express patterns: Every route has a dedicated router, controller and service. Furthermore, there is a client and a service module for each external system.
The client is a modular React application that is primarily split into the actual app (where users are after they authenticated) and a public area, that is accessible without login. The different routes correspond to different modules and submodules.
Development
Requirements
You need to have a recent version of node installed, for instance v12.6.0. npm (or yarn) can then be used to install all other dependencies.
Getting started
Compile TypeScript
When you run the app for the first time (or after making changes to the type definitions), you have to compile TypeScript. Either run tsc -b manually or use the npm scripts provided in the sub-directory:
 cd types
 npm install
 npm run build
Please refer to the README in the /types sub-directory for further instructions.
Install dependencies
This needs to be done in both the client and server sub-directories.
npm install
Run in development mode
 # run server
 cd server
 npm run dev

 # or run server in debug mode
 cd server
 npm run dev:debug

 # run client
 cd client
 npm run start
Local development
Once the API server is started locally, it will be available at http://localhost:3001/api/v1. It can be tested, for instance using curl:
curl localhost:3001/api/v1/patients
If you run the React client at the same time, it will be using port 3000 and accessing the server at 3001.
Testing
Both client and server are tested using Jest.
 # run client tests
 cd client
 npm run test

 # run server tests
 cd server
 npm run test
Jest provides a couple of advanced features, for instance you can generate a coverage report with npm run test -- --coverage or run tests in an interactive loop via npm run test -- --watch.
Build and deployment
Local builds
To build the software locally, run
 # compile and run server in production mode
 cd server
 npm run compile
 npm start

 # build client
 cd client
 npm run build
Building and running the docker images
Note that the actual deployment leverages Docker. A Dockerfile is provided for both client and server and the typical development workflow uses Azure DevOps pipelines to build and release the app.
 # client
 docker build \
     --build-arg REACT_APP_BACKEND_HOST=http://localhost \
     --build-arg REACT_APP_BACKEND_PORT=3001 \
     --build-arg REACT_APP_BACKEND_TIMEOUT=15000 \
     --tag holorepository-ui-client \
     --file ./client/Dockerfile .
 docker run -d -p 3000:3000 --name holorepository-ui-client holorepository-ui-client:latest

 # server
 docker build -t holorepository-ui-server -f ./server/Dockerfile .
 docker run -d -p 3001:3001 --name holorepository-ui-server --env-file ./server/.env holorepository-ui-server:latest

 # test connections
 echo "Testing client" && curl http://localhost:3000/app/
 echo "Testing server" && curl http://localhost:3001/api/v1/patients
Note that the Dockerfiles are specified independently of the build context through the -f flag. This is necessary in order to copy ./types, which would otherwise cause an error as it is outside the default build context. The build context therefore needs to be this parent directory.
Using docker-compose
Alternatively, you can start both client and server with one command: docker-compose up. Note that this will use port 3000 for the client and 3001 for the server, in contrast to a production deployment where the ports would usually be mapped to port 80 on the host.
Deprecated: While this will still work, there is now a comprehensive docker-compose file at the project root directory. As the UI depends on other components to run properly, it is highly recommended to use that one instead.
Integration
Client-Server API specification
The internal API between the client and the server can be found in server/src/routes.ts and essentially consists of these routes:
/practitioners/patients/holograms/pipelines/imagingStudies
Other services
The server accesses the EHR FHIR server (respectively the stand-in we deployed on Azure) to read medical data concerned with patients, practitioners and imaging studies. To display information about and download/delete/upload holograms, it communicates with the HoloStorage Accessor API. Furthermore, to generate new holograms and enquire information about available pipelines, it communicates with the HoloPipelines through the respective API.
Contact and support
This component is owned by Niels. Please get in touch if you have any questions. For change requests and bug reports, please open a new issue.